Guides & Tutorials
Part 2 - Angular Jamstack Site with Dynamic Data Using Sanity.io
If you're just joining us, this is part two of the series where we build out an Angular site that grabs data from Sanity.io, a headless CMS, using Netlify Functions and Build Hooks.
Part 1 of this series covered:
- Starting with a pre-rendered Angular site template
- Setting up a headless CMS with Sanity.io
- Grabbing the data from the CMS using Netlify Functions
Here, in Part 2 we are going to:
- Add an Angular Service to handle the incoming data
- Create and update Angular components to display the data
- Setup a build hook to update the page when new data is added
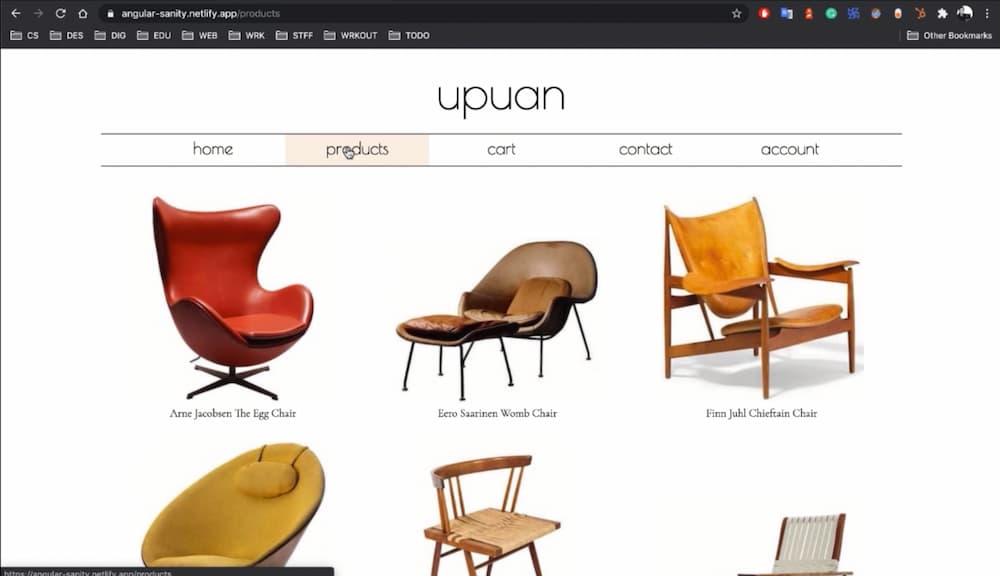
This is what the page will look like:
⏩ Want to skip the reading and just "make it work"? Here's is the project repo, or you can click the button below to deploy the site now!
Making the Angular Service
In the first part of the series we added a Netlify Function to grab the data we needed from Sanity.io. Now, we will use an Angular service to access that data.
Adding the Product Model
One thing that we'll need before anything else is an interface of the product data we're receiving from Sanity.io. An interface is a TypeScript syntactical contract defining types so they can be checked. The Product interface is very complicated...everything is type string 🙃. Rest assured you can assign other types in interfaces.
export interface Product {
  id: string;
  name: string;
  price: string;
  url: string;
  image: string;
  description: string;
}
HTTP For You and Me
Another thing we'll need for the service is the HTTP Client. This is an injectable class with methods to perform HTTP requests. We'll import that in the app's main module file.
import { BrowserModule } from '@angular/platform-browser';
+ import { HttpClientModule } from '@angular/common/http';
import { NgModule } from '@angular/core';

import { AppRoutingModule } from './app-routing.module';
import { AppComponent } from './app.component';
import { NavigationComponent } from './navigation/navigation.component';

@NgModule({
  declarations: [AppComponent, NavigationComponent],
  imports: [
    BrowserModule.withServerTransition({ appId: 'serverApp' }),
    AppRoutingModule,
+    HttpClientModule,
  ],
  providers: [],
  bootstrap: [AppComponent],
})
export class AppModule {}
On To the Actual Service
To make the service we can use the handy generate command from the Angular CLI to create the files we need.
ng generate service services/Products
💡 We're using the full command here but we could also use the shortened version
ng g s services/Product.
Once we have the generated files (product.service.ts & product.service.spec.ts), we can import the HTTP client and the Product interface. We'll also import Observable from the RxJS library since the products will be coming through as an observable sequence.
Inside the ProductService class we'll use dependency injection to use the HTTP client in the service. Finally, we'll make a function, getProduct that will be returning Observable<Product[]> from its HTTP GET call to where the Netlify Function lives on the live site: /.netlify/functions/getProducts. The last thing we'll add to the function is an object that passes the GET call a headers object that sets the Content-Type to application/json.
Put it all together and what we get:
src/app/services/products.service.ts
import { Injectable } from '@angular/core';
+ import { HttpClient } from '@angular/common/http';
+ import { Observable } from 'rxjs';

+ import { Product } from '../models/Product';

@Injectable({
  providedIn: 'root',
})
export class ProductsService {
+ constructor(private http: HttpClient) {}

+ getProducts(): Observable<Product[]> {
+   return this.http.get<Product[]>('/.netlify/functions/getProducts', {
+     headers: {
+       'Content-Type': 'application/json',
+     },
+   });
+ }
}
Adding & Updating the Components
Now it's time to really see the work we've done, literally. We'll make a new component to hold the product information. Then we'll update the existing Product component with the newly created component.
Product List Component
To make a component that lists the product, we'll use the Angular CLI generate command again. This time we'll use it to make a component as so:
ng g component components/ProductList --module products.module
We want to pass it the products.module module (using --module) so that it becomes a child component of the main products component and they can share data.
The TypeScript Part
Inside the ProductList component's TypeScript file we will:
- import the
Inputdirective in order to share data from parent to child component - import the
Productinterface we made in the first step - inside the
ProductListComponentdeclare and instantiate the product data we're sharing from the parent Products component:@Input() product: Product.
All of that looks like this:
src/app/components/product-list/product-list.component.ts
+import { Component, OnInit, Input } from '@angular/core';
+import { Product } from 'src/app/models/Product';

@Component({
  selector: 'app-product-list',
  templateUrl: './product-list.component.html',
  styleUrls: ['./product-list.component.css'],
})
+export class ProductListComponent implements OnInit {
+  @Input() product: Product = {
+    name: 'test',
+    id: '1',
+    price: '1.23',
+    url: 'https://netlify.com',
+    image: 'https://bit.ly/20o7MGL',
+    description: 'test',
+  };

  constructor() {}

  ngOnInit(): void {}
}
💡 We instantiate the
productdata with default data because TypeScript is set to strict mode and will throw an error if it doesn't have matching types for the Interface, Product. I will show a work around for this further into the post in case this is too cumbersome.
The HTML Template Part
Now we get to the actual showing of stuff! To do this we're going to use the product data we're passing in and use dot notation to grab the parts of the product data we want to use.
Like so:
src/app/components/product-list/product-list.component.html
-<p>product-list works!</p>
+<div class="product-item">
+  <img [src]="product.image" />
+  <div class="product-item-details">
+    <h3 class="product-name">{{ product.name }}</h3>
+  </div>
+</div>
The CSS Styling Part
Finally, the super complicated CSS goes into the component's CSS file. I'm kidding, we're just going to center-align the text.
src/app/components/product-list/product-list.component.css
+.product-item-details {
+  text-align: center;
+}
Phew, we've got the component that shows all the products! BUT it's still not being rendered because we haven't passed this component to the Product template. Guess what we're going to do next!
Updating the Product Component
From the template project we have a Products component to list all of the products. This is where we'll make the changes to insert all the components for each product.
The Module Part
We've actually already changed one of its files without even opening it! When we used the generate command to make the Product List component we referenced this Products' module. Doing so imported the Product List component in the Products' module TypeScript file.
src/app/products/products.module.ts
import { NgModule } from '@angular/core';
import { CommonModule } from '@angular/common';

import { ProductsRoutingModule } from './products-routing.module';
import { ProductsComponent } from './products.component';
+import { ProductListComponent } from '../components/product-list/product-list.component';

@NgModule({
+  declarations: [ProductsComponent, ProductListComponent],
  imports: [CommonModule, ProductsRoutingModule],
})
export class ProductsModule {}
The TypeScript Part
The Product component is the parent component that will be sending the product data to the Product List component. Like with the Product List component, we'll need to import Observable and the Product interface. We also need to import ProductsService, the service we created earlier that calls the getProducts Netlify Function.
Inside of the class is where we do all the work:
- assign
productsto an observable array of the interface we made, Product - inside the constructor we use data injection to use the service,
ProductsServiceand assign it toproductsService - when the lifecycle
ngOnInitis called (after Angular has initialized all data-bound properties of a directive), we assignproductsto what is returned fromgetProductsinside the serviceproductsService
src/app/products/products.component.ts
import { Component, OnInit } from '@angular/core';
+import { Observable } from 'rxjs';

+import { ProductsService } from 'src/app/services/products.service';
+import { Product } from 'src/app/models/Product';

@Component({
  selector: 'app-products',
  templateUrl: './products.component.html',
  styleUrls: ['./products.component.css'],
})
export class ProductsComponent implements OnInit {
+  products!: Observable<Product[]>;

+  constructor(private productsService: ProductsService) {}

  ngOnInit(): void {
+    this.products = this.productsService.getProducts();
  }
}
💡 When
productsis declared at the beginning of theProductsComponentclass I use the!, the TypeScript non-null assertion operator. This is the workaround I mentioned earlier that can be used instead of initializing with default data as we did in the Product List component. I don't recommend this but thought it was a good alternative to show instead of turning TypeScript's strict mode off.
Okay, we have the data! Let's get going.
The HTML Template Part
We're going to change a few things inside of the Products HTML template:
- add a section for the Product List component
- apply an
*ngIfconditional directive to say if we have the products data use an async pipe assigning the data toproducts, else displaying a loading block Angular template - then we pass in the Product List component (
app-product-list) - we also pass a few parameters to the Product list component including an
*ngForto loop through the products and assign each one toproduct - inside the component we'll use Angular's text interpolation to display the product's name (
{{ product.name }}) - finally, we take the existing 'loading' text and place it inside the conditional
ng-templatenamed#loadingBlock
That was a lot of words but let's take a look below to see what the code actually looks like.
src/app/products/products.component.html
<div class="products">
+  <main
+    class="products-list"
+    *ngIf="products | async as products; else loadingBlock"
+  >
+    <app-product-list
+      class="product-item"
+      *ngFor="let product of products"
+      [product]="product"
+    >
+      {{ product.name }}
+    </app-product-list>
+  </main>
+  <ng-template #loadingBlock>
+    <p>Loading products...</p>
+  </ng-template>
</div>
The CSS Styling Part
Let's make sure the products look good on the page. We'll use inline-flex for the display, use wrap for the flex-wrap, and set the justify-content to space-evenly. We're just going to focus on how this looks on the desktop for now. With that in mind, we'll set margin to 15px, min-width to 350px, and the width of each product div to 20%.
src/app/products/products.component.css
.products {
  margin: 0 auto;
  width: 80%;
}

.products p {
  font-family: 'Poiret One', sans-serif;
  font-size: 40px;
  margin: 50px;
  text-align: center;
}

+.product-item {
+  display: inline-flex;
+  flex-wrap: wrap;
+  justify-content: space-evenly;
+  margin: 15px;
+  min-width: 350px;
+  width: 20%;
+}
Eye on the Product
Get excited, we can finally see how this looks! To do so locally, we can run ntl dev in the root directory of the project. Then we'll head to localhost:8888/products.
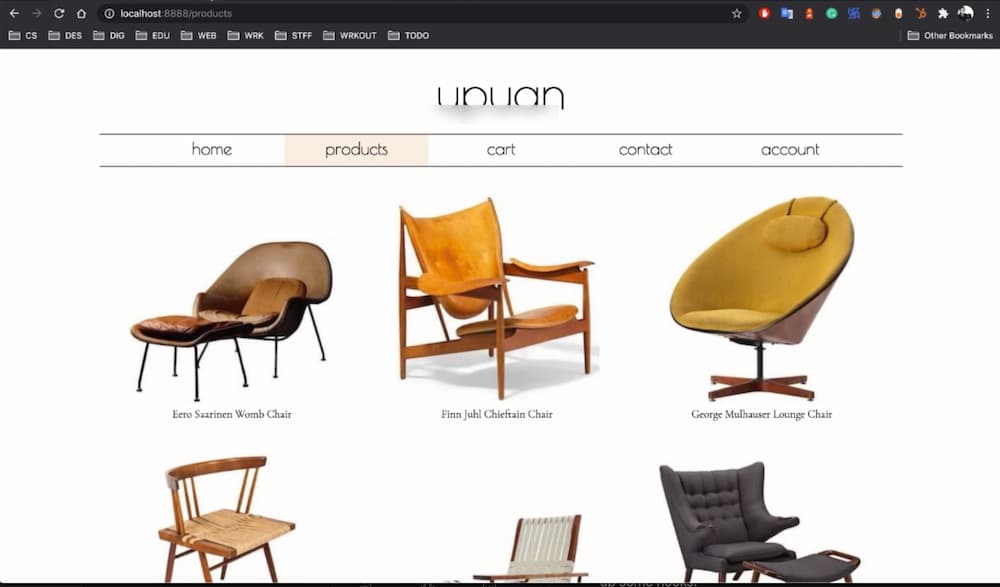
Now if we've either already hooked this project up to Netlify using the CLI ntl init command, or followed the steps in part 1 of this series, we have CI/CD set up. That means we can git commit the code changes we made and it will trigger a new build of the project. Then we can head to the project dashboard or run the command ntl open to have Netlify take us right to the dashboard. Once, the new build is published we should see the same products we saw locally.
Hook it Up
The data from Sanity.io will be added to the site whenever it is built. To make sure we grab data right when it's entered into the CMS, we can set up some hooks.
Adding a Netlify Build Hook
Netlify provides an easy interface for setting up Build Hooks through the project's dashboard. We'll head to Site settings > Build & deploy > Continuous deployment > Build hooks and click the 'Add build hook' button. Today we'll just set the name to 'angular-sanity', for identification, and use the 'main' branch.
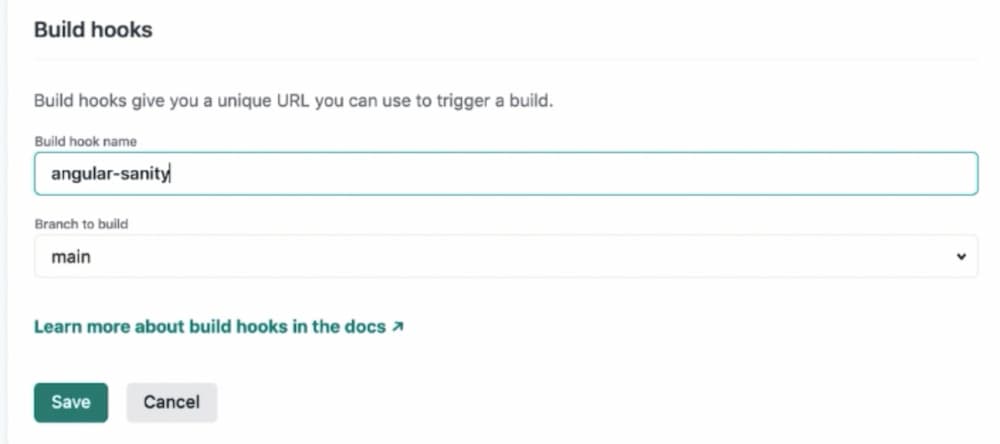
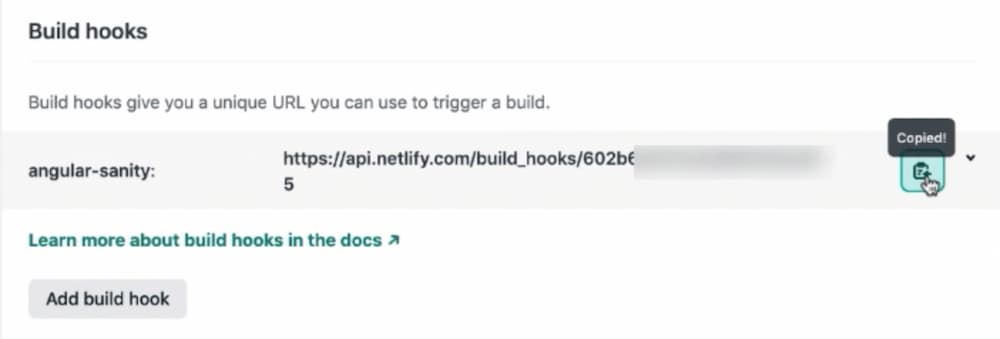
Once we have the build hook information saved, we'll get a unique URL to copy for the next step. To trigger this hook, we need to send a POST request to that URL. Thankfully, Sanity.io has a quick process to set up that POST request.
Creating a Sanity Hook
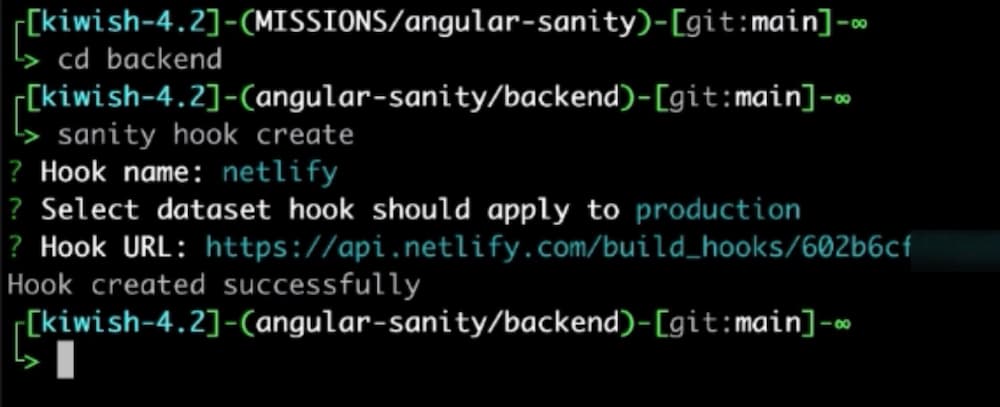
In the terminal, we need to make sure we're in the backend directory where our Sanity.io instance lives. We can then use the Sanity.io CLI to create a hook with just one command.
sanity hook create
Through the prompts, we'll name the hook netlify, set the dataset to production, and paste the link we just received from Netlify when we made the Build Hook.
Hook Test
Does this work? Well, let's add a new product and see about that. We can head back to our deployed Sanity.io instance. The address for this can be found at the top of the project dashboard beside 'Studio'. Check out the section on Sanity deploying in the first part of this series to see where this link lives.
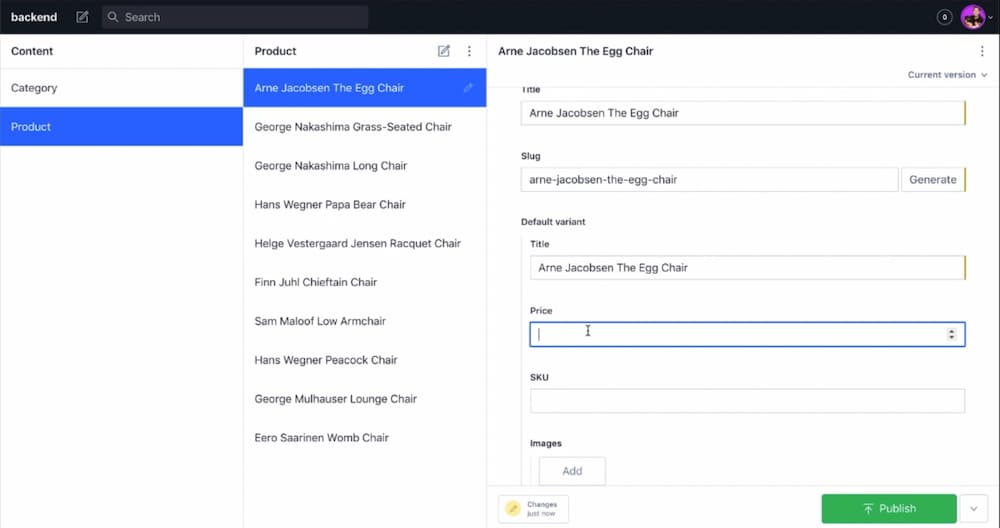
After hitting 'Publish' on the new data, we can look at the Netlify Production deploy logs (on the project's main dashboard) and see that a build has been triggered by the Build Hook.
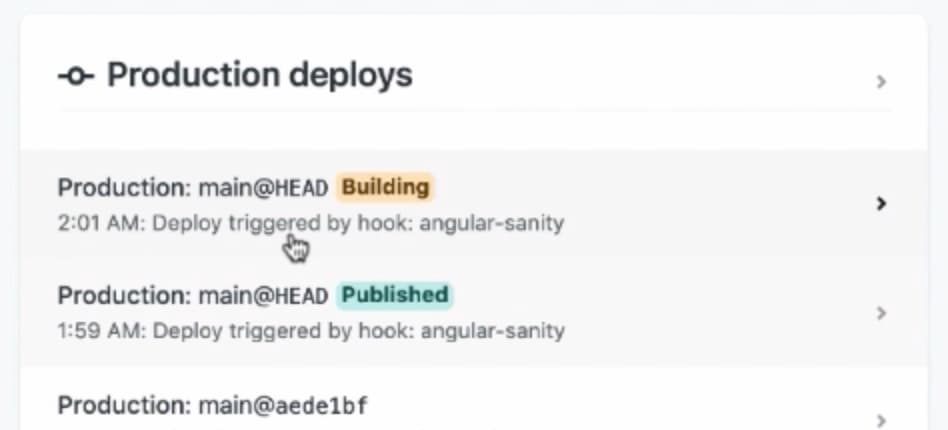
Once that deploy is published we just head back to our site and, voila, a new product!
C'est Fini!
We've accomplished what we've come here to do. We now have a pre-rendered Angular site, deployed to a CDN, that is grabbing information from a headless CMS (Sanity.io) using a Netlify Function, and updating with a build hook for dynamic data. Congrats! I hope this helps you on your Jamstack "Jamgular" future. Happy coding 👩🏻💻!


