Guides & Tutorials
E-commerce Checkout with Angular, Netlify Functions & the Stripe API
When it comes to eCommerce sites it's pretty important to have people, you know, give you money. Stripe has a quick checkout process that we can plug into our existing application using a serverless function, like Netlify Functions. Instead of having to code out the whole transaction process, we can send Stripe information about the product the user wants to purchase and let them handle the rest. Words can only do so much, so let's code this out.
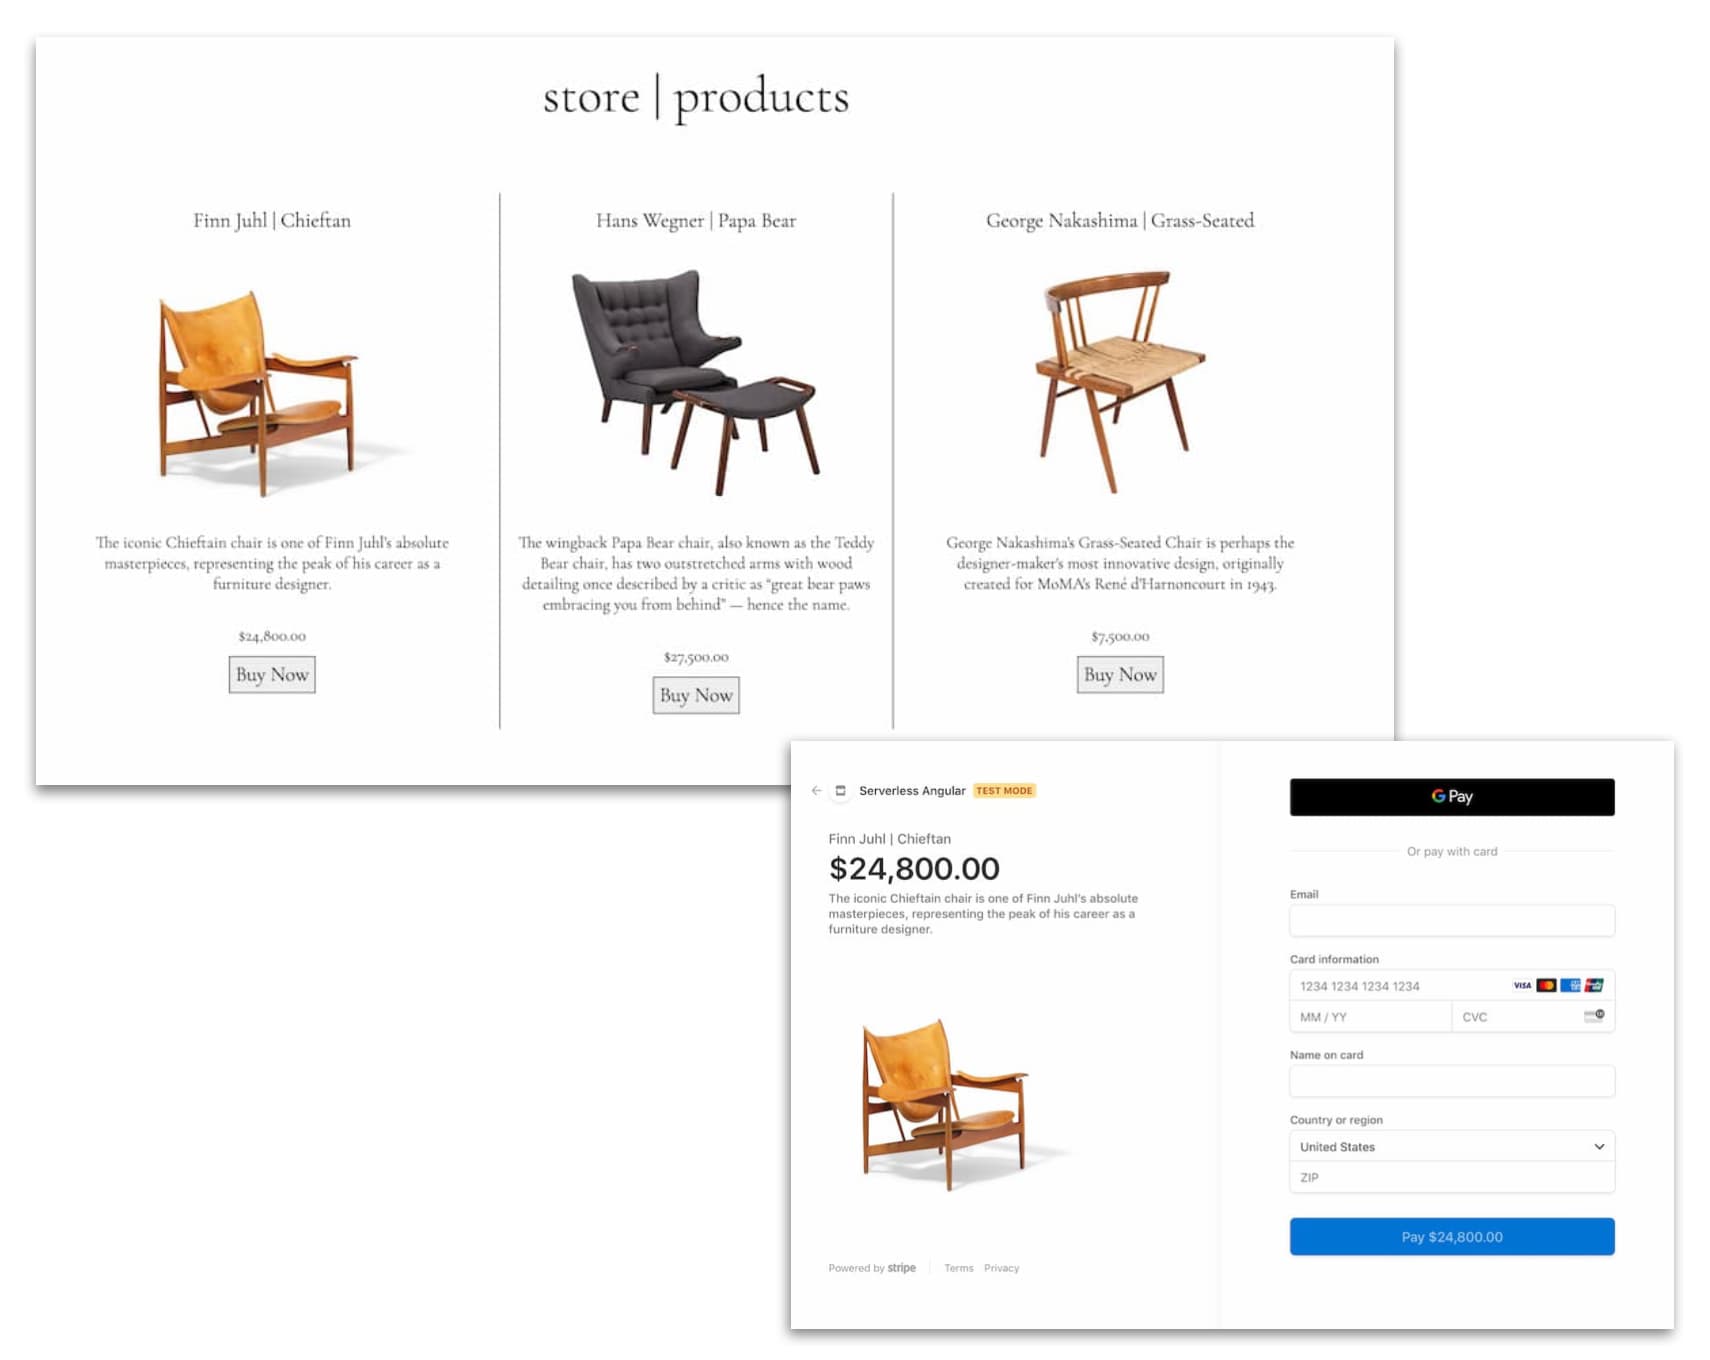
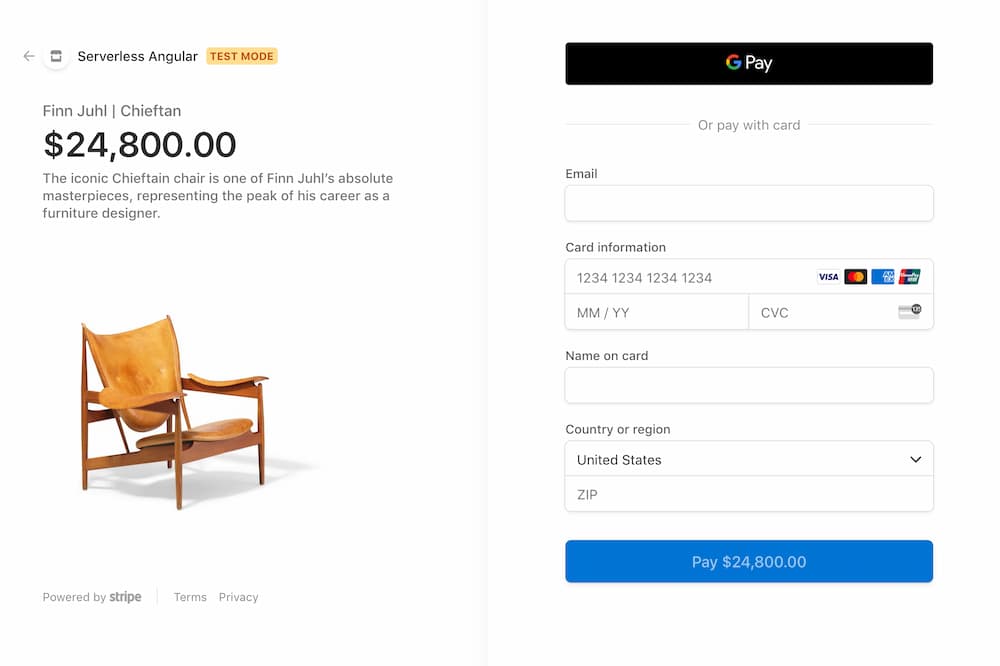
First off, here is what the end product for today will look like: a simple product page with 'Buy Now' buttons and the Stripe checkout page the users are sent to for making their purchase.

Here is what we'll do in this post:
- start off with an Angular project that lists some sample products
- setup Stripe credentials in the project environment variables
- create a Netlify Function that interacts with the Stripe API
- listen for the 'Buy Now' button click to trigger the Netlify Function and
- make a function that loads Stripe to redirect the user to the checkout page with the information needed
All the code can be found in this repo and if you want to try it out for yourself, click the button below to deploy it to Netlify.
Okie dokie, let's get coding.
Start Off with an Angular Project
In order to jump right in, we'll use the ng new command from the Angular CLI to scaffold a project. Since our focus today is on Stripe and not project creation, I'll list the steps to make the UI. Click the little octopus emoji (🐙) on each line to see the commit of the code changes for each step.
- remove the generated template code, add a header to the main page 🐙
- add and import a JSON list of products 🐙
- iterate over the JSON product list to display the products' information and add a 'Buy Now' button 🐙
- style the page so it doesn't look so silly 🐙
Here is what this page will look like:

With that in place, we can now add some functionality to that button!
Setup Stripe Credentials
One of my favorite things about deploying on Netlify is how easy it is to set up environment variables. We just need to add them to our project's 'Environment' settings. Then your whole team has them no matter where they are. Let's look at how this works by setting up the Stripe credentials we'll need for checkout.
Grabbing Stripe Keys
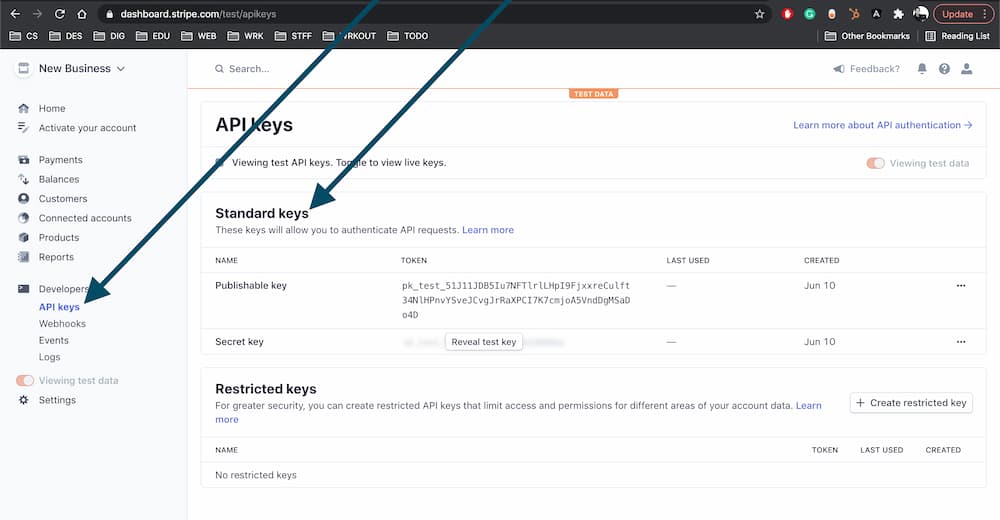
On the Stripe dashboard at https://dashboard.stripe.com/test/apikeys, on the left-hand side under the 'Developer' menu, there is an 'API keys' menu. In that section, we'll find the 'Publishable key' and 'Secret key' we need for this project.

🚨 If you have an activated Stripe account and are just trying this out make sure you have 'Viewing test data' toggled on the left-hand side of the dashboard.
Setting up the Project on Netlify
To add the credentials to the project's Netlify dashboard we have to first make it a Netlify project. Such logic, amirite? First, we'll create a Netlify configuration file named netlify.toml in the base directory to specify how to handle our Angular application. Here's what it should contain:
netlify.toml
[build]
  publish = "dist/angular-stripe-checkout"
  command = "ng build --prod"
📚 Check out this blog post about the first steps with Angular and Netlify to learn more about this file and more!
Next, we'll install the Netlify CLI then run the init command to get set up.
npm install netlify-cli -g && netlify init
Now every time we push code to git, a deploy will be triggered. If that's not something you want, you can change that and much more on the project dashboard under the Build & deploy menu. This just so happens to be where we can also add the Stripe credentials.
Adding Stripe Env Vars
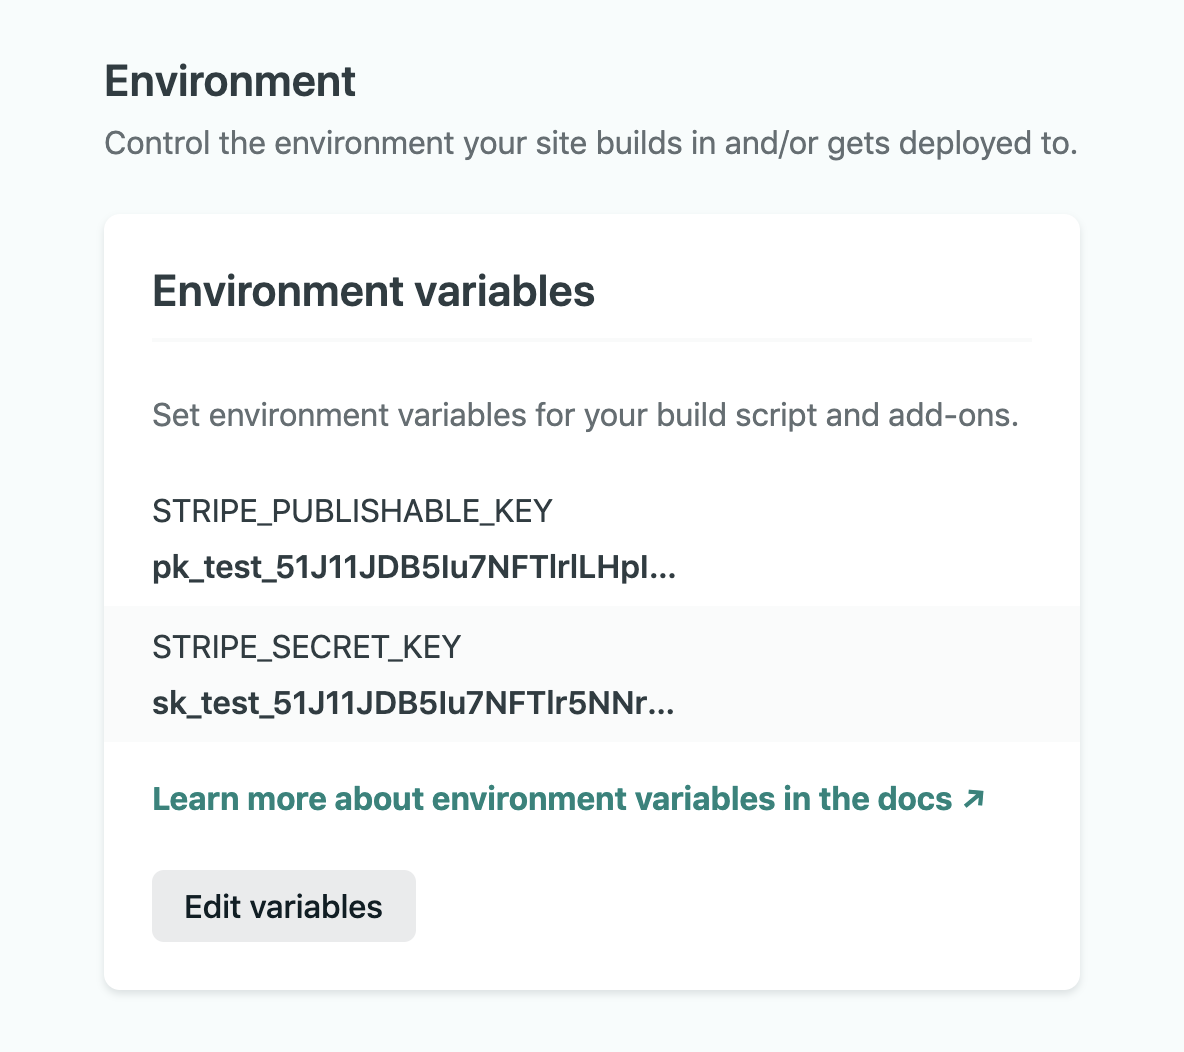
Under the project's 'Environment' menu is a section for 'Environment variables'. Click the 'Edit variables' button to add the two Stripe keys from the Stripe account, naming them like so:
STRIPE_PUBLISHABLE_KEYSTRIPE_SECRET_KEY
Then click 'Save' and we're all set!

With that, the project credentials are all set.
Create a Netlify Function
It's time to talk to Stripe so the first thing we'll do is bring in the Stripe libraries by installing them with npm.
npm i stripe @stripe/stripe-js
Then we can start creating the serverless function by making a netlify/functions folder in the base directory and making a createCheckout.js file.
🧠 If you want to configure a custom functions directory you can point to it in the
netlify.tomlfile, otherwise Netlify will find all the functions as long as they're in the~/netlify/functionsfolder.
In this file, we'll
- require the Stripe library and pass in the Stripe secret key environment variable
- make an async function passing in
eventfrom the button click - assign
productto the information, we get fromevent - make a
listItemsvariable with the information Stripe checkout needs (check out the Stripe docs for more info) - create a stripe checkout session with the project's home page as the URLs and also passing in the
lineItemswe just created (more info about Stripe's session object here) - finally, return a
200status code, the session we just created as well as our Stripe publishable key
This is what all those things look like in the form of code a.k.a. this is what the serverless function should look like.
netlify/functions/createCheckout.js
const stripe = require('stripe')(process.env.STRIPE_SECRET_KEY);

exports.handler = async (event) => {
  const product = JSON.parse(event.body);
  const lineItems = [
    {
      name: product.name,
      currency: 'USD',
      description: product.description,
      images: [product.image],
      amount: `${product.price}00`,
      quantity: 1,
    },
  ];

  const session = await stripe.checkout.sessions.create({
    payment_method_types: ['card'],
    success_url: process.env.URL,
    cancel_url: process.env.URL,
    line_items: lineItems,
  });

  return {
    statusCode: 200,
    body: JSON.stringify({
      sessionId: session.id,
      publishableKey: process.env.STRIPE_PUBLISHABLE_KEY,
    }),
  };
};
🐙 Here is the commit where we create the serverless Netlify Function.
Listen for the 'Buy Now'
No, no, not that voice in your head that says "Buy Now" whenever you see a croissant for sale. We want to listen for when a user clicks the 'Buy Now' button under each product. Now I want a croissant. Anyhoo, let's start by adding the Angular HTTP module which we'll need to post to the serverless function. In the app.module.ts, we'll import the HTTP module and add it to imports like so:
src/app/app.module.ts
import { NgModule } from '@angular/core';
import { BrowserModule } from '@angular/platform-browser';
+ import { HttpClientModule } from '@angular/common/http';

import { AppComponent } from './app.component';

@NgModule({
  declarations: [AppComponent],
+   imports: [BrowserModule, HttpClientModule],
  providers: [],
  bootstrap: [AppComponent],
})
export class AppModule {}
Now that we have the HTTP module set up we will want to inject it into the app component inside the constructor of the app.component.ts file:
constuctor(private http: HttpClient) {}🐙 Here is the commit where we added the HTTP information for the project.
Creating the Stripe Checkout
The next step is making the function that is triggered by clicking the 'Buy Now' button. This event will have the product information that we need to pass to Stripe. The function we call triggerCreateCheckout is very aptly named. This asynchronous function will:
- take the event information passed in and assign it to
eventProduct - assign response (which will be declared ahead of time as
private response: any;) to an awaited function that posts to the Netlify FunctioncreateCheckout eventProductwill be passed to the POST operation to the serverless function along with an object that sets the headers Content-Type- use
toPromiseto make the response a promise - and finally, pass the repsonse to a function we'll make next to open Stripe
Let's see what this looks like.
src/app/app.component.ts
...
export class AppComponent {
  products: any = products;
  private response: any;

  constructor(private http: HttpClient) {}

  async triggerCreateCheckout(eventProduct: any) {
    this.response = await this.http
      .post('/.netlify/functions/createCheckout', eventProduct, {
        headers: {
          'Content-Type': 'application/json',
        },
      })
      .toPromise();
    this.openStripe(this.response);
  }
}
🐙 Here is the commit that adds this function.
Opening the Checkout
Let's tackle the function where we actually open up the Stripe checkout. We need to import the loadStripe function from Stripe's stripe-js library. Then we'll make an async function called openStripe that will
- have the Stripe credentials passed to it
- make a
stripevariable that is assigned to what is returned from theloadStripefunction that will have the publishable key passed in - once loadStripe is ready run, another awaited function that calls
redirectToCheckoutpassing the newsessionIdto open the purchase page
src/app/app.component.ts
import { loadStripe } from '@stripe/stripe-js';
...
  openStripe = async (stripeParams: any) => {
    const stripe = await loadStripe(stripeParams.publishableKey);
    const { error } = await stripe!.redirectToCheckout({
      sessionId: stripeParams.sessionId,
    });
  };
🐙 Can you guess what this commit is? If you guessed the one that adds the openStripe function, you're right!
All together this is what the file looks like:
src/app/app.component.ts
import { Component } from '@angular/core';
import { HttpClient } from '@angular/common/http';
import { loadStripe } from '@stripe/stripe-js';
import products from './products.json';

@Component({
  selector: 'app-root',
  templateUrl: './app.component.html',
  styleUrls: ['./app.component.css'],
})
export class AppComponent {
  products: any = products;
  private response: any;

  constructor(private http: HttpClient) {}

  async triggerCreateCheckout(eventProduct: any) {
    this.response = await this.http
      .post('/.netlify/functions/createCheckout', eventProduct, {
        headers: {
          'Content-Type': 'application/json',
        },
      })
      .toPromise();
    this.openStripe(this.response);
  }

  openStripe = async (stripeParams: any) => {
    const stripe = await loadStripe(stripeParams.publishableKey);
    const { error } = await stripe!.redirectToCheckout({
      sessionId: stripeParams.sessionId,
    });
  };
}
We can test it locally by running netlify dev or by pushing the new code up to the project repo (which would trigger a new deploy) and seeing how it works in the real world by going to the live site. Whichever environment, we should be able to click the 'Buy Now' button and be sent to the Stripe checkout process for the product clicked.

📚 To learn more about developing Netlify Functions with Angular check out this blog post on just that
Time to Checkout
Guess what, we can check out mentally now because we have a working checkout process! With this project, we were able to grab information about a product, pass it to a serverless Netlify Function that talks to the Stripe API, then open up the Stripe checkout page to handle the transaction. Instead of setting up a whole checkout process yourself leave it to the experts at Stripe. Now, you'll have time to do more important things like eating croissants. Happy coding 👩🏻💻!


